
Showing posts with label recipe. Show all posts

Sunday, May 11, 2025

The Last Dish of Spring: Cooking Japanese butterbur


Now the flowering season of spring ephemeral is over. Day by day, gardens, parks, forests, etc. are covered more and more with green leaves. The colors of leaves started from pale green, then become darker. We’re entering the season of mowing. We keep crossing our fingers for this summer not being so harsh as the last year … We could avoid perils of heat shocks during forestry work, couldn’t we? Well, before walking into the inferno, we have a small pleasure in a prep of scything. We harvest butterbur.

Minois dryas

Butterbur, Petasites japonicus or Fuki in Japanese, is herbaceous plant native to Japan. Sometimes farmers nurture them for their business. And we can find wild Fuki in forests around us. It loves sunny, wet, and less windy margins of forest. They multiply through its underground stem, just like bamboos. From the rhizome, green stems shoot out and at the top is a heart-shaped large leaf. Kids can play with the leaves, making face masks or umbrellas of forest. In our climate of Kanagawa Prefecture, fuki won’t grow much tall nor with larger leaves compared with those in more northern areas of Japan. Still, in Yokohama they can be 50cm or so tall and with approx. 30cm in diameter leaves. As long as the condition is met, they dominate the field as “weed.” So, in Niiharu Citizen Forest we mow them at the end of spring to control their spread. Never mind. They will cover the ground again before winter. Oh, one more thing before cutting hard. We have to harvest them for our spring dish.
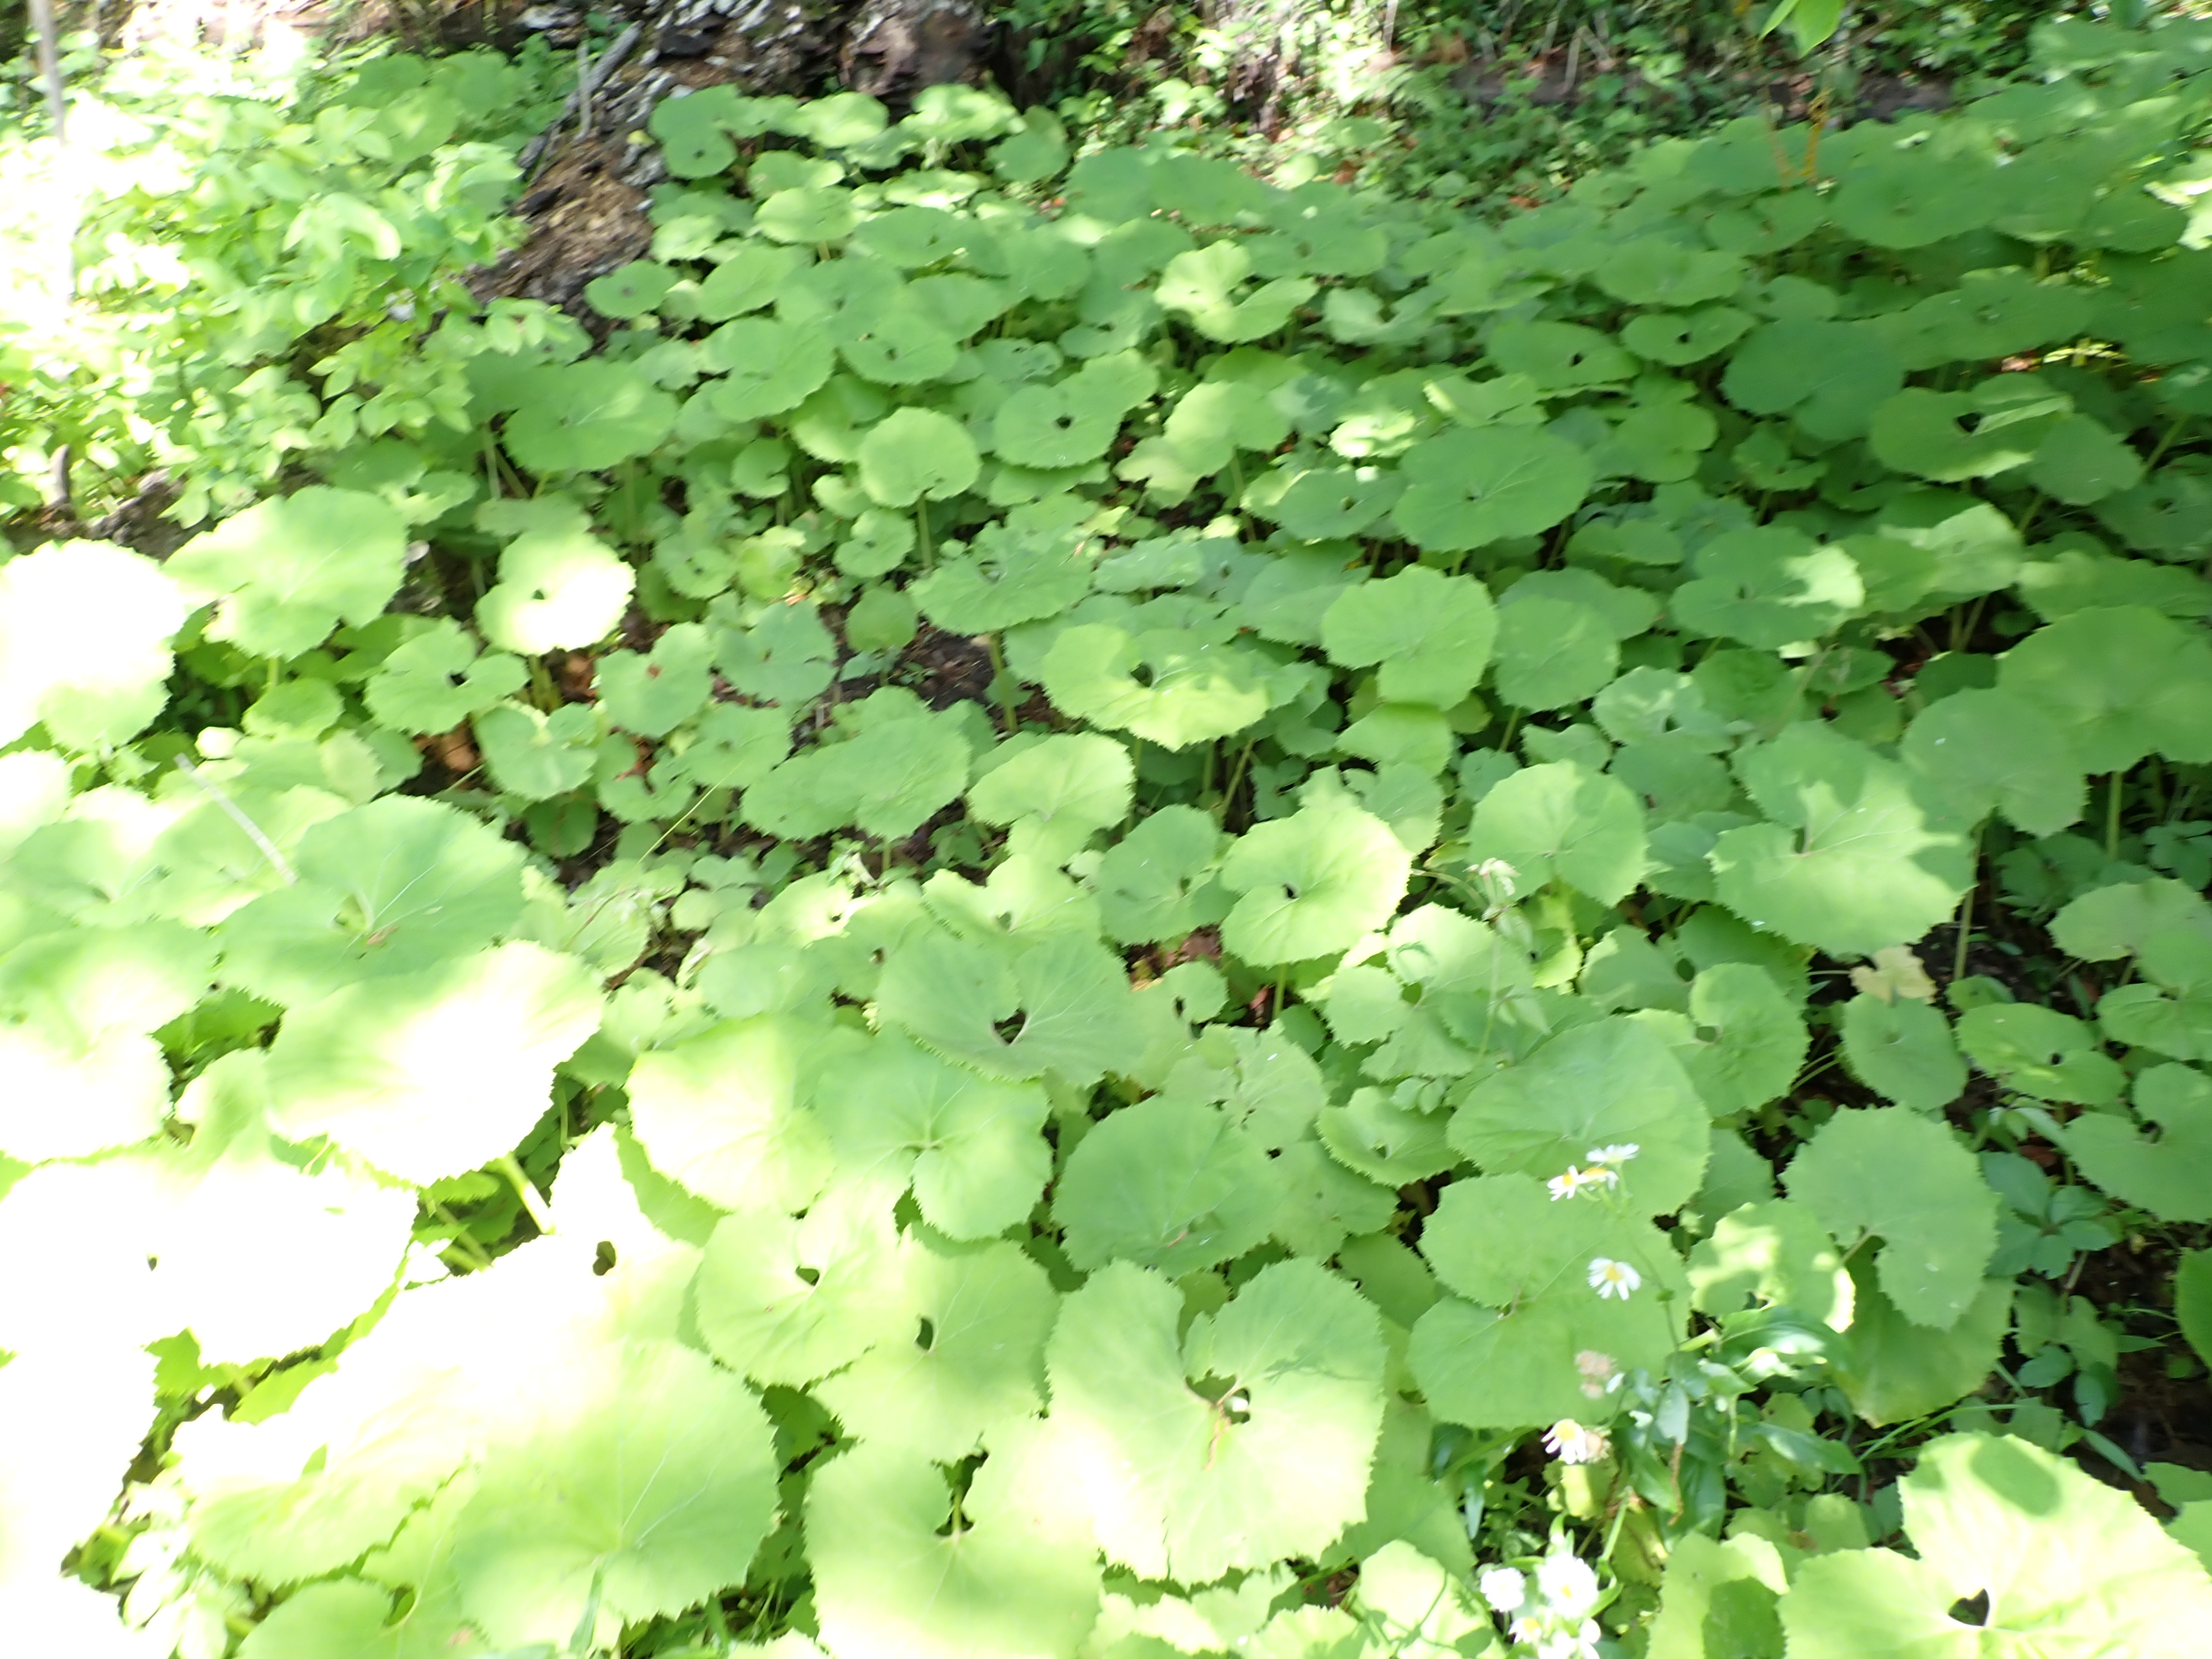

Fuki is covering completely the ground.

Yeah. Young fuki is edible. Professional farmers of colder climate distribute them for supermarkets as spring delicacy. Theirs can have 1m long with Ø1cm or more of stems. The way to cook them is similar to angelica. We peel the skin of it before cooking and stew in soy sauce, et al ... a bit cumbersome process. In Yokohama, we won’t expect that size from our fuki. Actually, it’s easier to cook Yokohama size. Let me tell you how.

Harvested fuki

First, we cut off the leaves from harvested fuki. In this recipe, we need a certain amount of fuki stems. They will be mowed as weed before long. i.e. Be greedy to have as much stem as possible! Several regional cuisines cook the leaves as well. I once tried it, and found they gave us an “acquired taste of bitterness.” Also, rhizome and roots of fuki are poisonous. Please be careful. In this post, I tell you about an easier dish with stems only.

Lots of stems

Next, cut the stems in 1 inch or so long BEFORE washing. Chopped fuki stems will be washed under running water until the downy hairs covering the surface are rinsed over. They can be removed easily in this way. If you find relatively thick stems, peel their skin. Otherwise, Yokohama-size, Ø0.5cm or so, can be prepared tender without peeling. Don’t worry.

Chopped fuki before washing.
I add salt for rinsing the fuki.
Though, it is not necessary.

By washing, hairs can be removed this much.

Chopped and washed stems are thrown in a pot. Cover with a lid, and heat it over medium heat for 30 to 50 minutes. The stems are steamed with their own moisture. I cooked 400g of fuki stems for 30 minutes. A senior of Niiharu Lovers who every year cooked fuki with this recipe said, “I normally cook 4 kg or more of it.” In her case probably 50 minutes of steaming would be appropriate. After heating, leave and cool the pot overnight with a lid.

Chopped and washed fuki stems

Next morning, add 6 tbspn (for 400g of fuki) of soy sauce, put a lid, and heat the pot until it resumes steaming. When the steam comes out, turn off the burner and leave it cool naturally. In the evening, shake the cooled pot to stir the content, then turn on the heat again until the pot emits the steam. Stop the fire and cool it naturally overnight.

After first steaming

On the third day, add 2 tbspn of sugar, and follow the same routine as above.

Cooled fuki after sugar added

And for the final day, add 5 tbspn of Sake in the same way as for soy sauce and sugar. Let it cool overnight. In the next morning, the dish is done.

Cooled fuki after sake added.
This recipe gives glaze over the veggie when it’s done.

It’s a nice dish for a spring breakfast with steamed rice. Mine was only 400g. The cooked fuki will be eaten up quickly. My Niiharu senior with 4kg of cooked fuki freezes her dish and defrosts necessary amount when she provides it for a family meal. “Oh, it can last for 10 months or so if you wish. But for my family it does not take that much to finish. 😊” Sweet and salty with Umami taste from glutamic acid of soy sauce softens the bitterness of fuki. It’s the end of spring treat. When you have a chance, please try.

Good morning!


If you have any questions about Yokohama’s Green Tax and Green Up Plan, please make a contact with

Strategic Planning Division, Green Environment Bureau, City of Yokohama
横浜市みどり環境局戦略企画課

Phone: 045-671-2712
FAX: 045-550-4093 

Friday, April 15, 2022

Secret Cuisine: Bamboo Charcoal Salt


Although charcoal made from bamboo has lower calorie than wood charcoal (and so it’s inferior as energy), it has several usages. Bamboos dead or alive have lots of holes in their body. After we bake them into charcoal, it keeps its porous property with numerous micro-holes. When a material is porous, its surface area is far larger than its appearance. For 1g of wood charcoal, the average superficial area is 200-400 m2. For 1g of bamboo charcoal, it’s 700 m2. Smelly molecules wafting in the air would be plugged in the nano pits from which is difficult to escape. The more porous, the more space to capture molecules. Purifying power of bamboo charcoal > Power of wood charcoal. Got it? People are studying to utilize such characteristics to make sustainable activated carbon for industrial use. Or, it can be used for cooking. There are several charcoal products that can be used for cooking rice. How-to is simple. Wash charcoal with tap of water sans soap, dry them well, throw it in a rice cooker above rice and water, and cook it as usual. Chemically treated tap of water will be purified by bamboo charcoal, and the taste of cooked rice is softer and N-I-C-E. We can do the same with the highest-grade wood charcoal, but the cost performance we get from cheaper bamboo charcoal can beat the luxurious Binchotan 備長炭. Not bad, huh?


Charcoal Baking Hut, Spring 2022,
Niiharu CitizenForest
新治市民の森

Niiharu Lovers bake bamboo charcoal since its inauguration some 22 years ago (; my posts on March 3 and 10, 2017). We sell them as a fund-raiser to support our forest maintenance activity. Having said that, we cannot peddle our product good for rice cooker. Reason? In Japan in order to sell any food the supplier must hold business license based on Food Sanitation Act. Yap, we do not eat charcoal itself when we use bamboo charcoal for rice cooker. But the minerals of charcoal will inevitably dissolve in water and absorbed by cooked material. On the other hand, Niiharu Lovers do not have money, or more precisely, enough sales to cover license application fee to sell our bamboo charcoal for cooking. i.e. We cannot market Niiharu’s bamboo charcoal for food. But it does not stop us to use personally our product for cuisine. Japan is a free country! Using our charcoal for rice cooking privately is a start. Then one day, I found there is another gastronomy fun to bake bamboo charcoal. That’s about salt. It’s Bamboo Charcoal Salt.

Preparing for the charcoal baking kiln

I’m sure porous property of bamboo trunk should do wonder when we make bamboo charcoal salt. The way to baking bamboo charcoal salt is easy, as long as you have an access for bamboo charcoal kiln. It goes like this.

Ingredients: Nice sized bamboo trunk, salt. And just in case for the salt bursting out from the bamboo, I used aluminum foil, small pebbles from Yadoriki, and hemp string for a cap.


First, punch inside of bamboo trunk to pierce node(s) of bamboo, except the lowest knot that will be the bottom of a “bamboo vessel.” I made a hole and washed the whole bamboo with running tap of water. You see, it will contain food …


Next, stuff the bamboo with salt. I used crude salt that is used to pickle vegetables in Japan.


I precautionarily made room at the top of bamboo pipe to stuff the pebbles in case the contents boiling over. In retrospect, that was not a problem in the end. But in order to protect the product from charcoal dust, the cap was useful.


Here, the cap, typical tuff of Tanzawa Mountains including lapillistone, on aluminum foil.


We capped the above prepared bamboo vessel with another bamboo piece.


It then stuffed in the kiln with the other bamboos for baking.


We simply fired the kiln as usual (; my post on March 3, 2017). When we opened the lid of the kiln, the salt staffed bamboo trunk looked like this. Here we go! How did it turn out …?


The bamboo vessel simply lost the shape of pipe after baked in 800-900+Co for 24 hours. But the mass of salt was kept in a sort of cup of bamboo pipe like this. Could you see on our left there is a cap part? I mean, baked pebbles and aluminum foil. It was a sort of impressive scenery for me. Tanzawa’s tuff was made from volcanic activity. Especially the greenish lapillistone was cooled lava. It did not kept its color after charcoal baking …


The lower part of the vessel turned into baked salt.


I threw away the pebble and aluminum part of the contents and ground the rest. Here! Bamboo Charcoal Salt!


According to Google search (for example, here, here and here), the recipe for bamboo charcoal salt was first created by Buddhist monks in Korean Peninsula some 1300 years ago. They bake salt in a bamboo trunk capped by loess, with fire from pine logs. The whole process takes 3 months, and the baking is done 9 times. I wonder how they keep the bamboo vessel during the process. Bamboos will crumble just after one trial ... Anyway, their aim was / is to create medicine. When such precious drug came to Japan, the recipe was modified. No loess, and logs are chosen from our backyard forests, not limited to pines. In the 21st century, several makers in Noto Peninsula 能登半島 provide this special salt about 1000 yen for 100g salt (for example, here). It is served in the exclusive restaurants in Japan for Tempura and Sashimi. I tried my product and found certainly the edge of regular salt has gone. The heat reached to the stuffed salt via miniscule holes transferred the essence of bamboo to the salt. It smells like hot spring egg. So, for sure we have to choose for which dish we can use this salt. But, for example, fried veggies go superb with this salt! Niiharu Lovers secretly shared the product after baking the last bamboo charcoal for this season. Our portion is like 3 tablespoons per person … we are treasuring it and waiting for the next charcoal baking season. Ahem! We are law abiding citizens. This salt is for us only, Not For Sale 😉.


If you find a problem in the greenery of north-half of Yokohama, please make a contact with

Office for the Park Greeneries in the North
北部公園緑地事務所
Yokohama Municipal Government Creative Environment Policy Bureau
横浜市環境創造局
Phone: 045-311-2016
FAX: 045-316-8420

Friday, April 1, 2022

Good things come to those who wait: Yubeshi part 2


So, from the ingredients for Yubeshi, you may think “Hmmmmm … it’s vegetable protein and fat, isn’t it?” Right. The main ingredients of miso paste is soy. Nuts are for unsaturated fatty acid. For yuzu peel, here is 2015 data from Ministry of Education of Japan:

For 100g of yuzu peel, the main nutrients are

59 kcal
Protein 1.2g
Fat 0.5g
Carbohydrate 14.2g
Vitamin E 3.4mg
Vitamin C 160mg


As reference, 100g of yuzu juice contains

21 kcal
Protein 0.5g
Fat 0.1g
Carbohydrate 7.0g
Vitamin E 0.2mg
Vitamin C 40mg


It’s obvious yuzu peel is more nutritious than its juice. I guess that’s why ancient warriors carried them as ration. Now we’ve completed mise en place. Let’s start cooking.


First, we mix well Miso paste, Sugar, and Flour of your choice. You can skip flour if you prefer. The taste of Yubeshi will be stronger, i.e., saltier.


Next, add nuts and sesame. Mix well.


Finally, add sake and mirin. Fold them thoroughly to make a sticky dough. Or, you could skip adding such liquid in the dough. Again, the taste of Yubeshi will be stronger and saltier without these ingredients.


Put the miso mixture in a cup of yuzu peel. I think this is the most important part of cooking Yubeshi. If you economize the mixture, when you cook the peel, it could collapse and Yubeshi won’t be a shape of power ball. When you add too much of miso and nuts paste, the dough will expand during the cooking and overflow from the cup at best, or tear the cup and no ball will come out. The key is just nice amount of miso mixture in a cup. It would be like 70% of a cup, which could be …


like these. For this amount of dough, when you put the lid on a cup, it sunks in the cup. Don’t worry this dropped-in. It will turn out a nice Yubeshi ball.


Steam Yubeshi balls for 60 minutes, or …


until the fat of the peel and sugar covers the ball thoroughly and turns the balls shiny like these. Could you see the peel cups also have color of miso paste? That’s pretty much OK.


The miso oozed out and turned the color of the peel. No problem.


Next, wrap each cooked yuzu balls with a parchment paper and fasten it with a rubber band. It’s like making heads of dolls. Frankly, it’s fun! Now we reach to the last process for preparing Yubeshi balls. Let’s hung them somewhere to dry. I used old laundry nets for economizing the space (;hey, we’re in Japan!). Add one ball in a net, fasten the net at the top of the ball with a twine, then add another ball. Continue this until all the space of a net is full. I then hung them from a hanger. Very luckily when I steamed Yubeshi balls, it was a damned fine January weekend so that I started my drying outside. But letting balls to be wet by rain is HUGE no-no. The place to dry Yubeshi balls are somewhere with nice air circulation, and dry. If you care, you can check the form of the ball while the cup is still wet. You massage them to make them rounder, just like making a snowball.


It depends on the dryness of the climate of your place. In normally very dry Yokohama’s January, Yubeshi balls will be hardened within 7 days or so. I’m not sure when it is OK for the cooked Yubeshi balls are still soft after 7 days … I guess in such a case there is a danger the cooked yuze cups are getting moldy and started to rotten, i.e. the failure of the cooking. That’s the reason people say cooking Yubeshi balls must be completed by the end of January in Kanto region, Yokohama included ... Metropolis Tokyo in December to January has very dry but not so harsh winter. Having said that, as long as the air is dry enough it won’t be a problem, I surmise. Traditionally, this Yubeshi balls are made not only in Nara Prefecture but also in Ishikawa Prefecture where they have huge amount of snow fall in winter. Heavy snow does not mean wet weather, you see?


The next step of this recipe is, W-A-I-T. Once the Yubeshi balls are hardened in the net, let them keep drying for at least one more month in a place of good air circulation. It means when you’ve completed cooking yuzu cups at the end of January, Yubeshi balls will become power balls in the first or second week of March. After the long waiting, the wrapped Yubeshi cups shrink in the paper to become like these.


Inside the paper wrap is completely dried Yubeshi balls. Once the Yubeshi reaches to this stage, it can be stored in room temperature.


To eat Yubeshi, the standard is to slice them. A ball Yubeshi is very hard, but cutting them is not hard. Come to think of it the inside of the cup was the mixture of miso paste that was once creamy. The taste of Yubeshi is salty (because of miso) and sweet (thanks to sugar). It has flavor of yuzu fruits, nuts, and sesame. As they have been folded by miso which is fermented by yeast, these peels and nuts are also matured in a cup and create complex harmony of savor. I tell you they are D-E-L-I-C-I-O-U-S!!!! No wonder one Yubeshi ball could cost 10 USD when we search them in stores. They can be very good tapas by themselves. People say combining the slice of Yubeshi with cheese goes superbly with wine. Naomi is enjoying them occasionally as luxurious afternoon snack with tea. Cherry blossoms are in full swing now …😊


If you find a problem in the greenery of north-half of Yokohama, please make a contact with

Office for the Park Greeneries in the North
北部公園緑地事務所
Yokohama Municipal Government Creative Environment Policy Bureau
横浜市環境創造局
Phone: 045-311-2016 
FAX: 045-316-8420


Friday, March 25, 2022

Ancient Power Bar: Yubeshi part 1


So, last January when I still held at hand lots of ripen yuzu fruits, I was searching for the way to store my harvest without using fridge. Oh-so-global-warming-approaches to save food in 2022 … It was difficult to encounter such non-fridge preservation of fresh produce unless sun-drying them completely. Yeah, drying fresh juice of yuzu fruits might be an option for manufacturers … maybe they can make yuzu powder from sour squeeze. I don’t have such nice equipment to perform the magic. I was becoming desperate ... Then, one night I vaguely watched tele. A travelogue by a comedian began. He went into a deep mountain of Yoshino area 吉野, Totsukawa Village 十津川村 of Nara Prefecture 奈良県. People of that community served him lots of local gourmet, like wild herbs, trout, gibier meats … They then gave him a slice of something. He asked, “What is it?” A lady replied with smile. “It’s Yubeshi, an ultimate preserved food. It’s traditional delicacy of our area. It is made of yuzu fruits.” Bingo.

Store-bought version of Yuzu vinegar

In that tele, the ladies of Yoshino explained there is a legend the food was brought from Kyoto 京都 some 900 years ago by samurai warriors of Heike Clan 平家. Between 1180 and 1185, Japan was in turmoil of civil war. Two big clans of samurai, Genji 源氏 and Heike, crushed for power grab of the nation. In the end, Heike clan was defeated completely. Many soldiers who fought for Heike escaped with their bare life and hid into deep mountains. Yoshino mountains were one of such chosen areas. According to the ladies in the tele, at that time mountain people who gave shelter for Heike survivors noticed the samurais wore formerly-gorgeous but now dirty and blood-stained armour without much provisions. Even though, they dangled few brown balls and bamboo-made water bottle from their waist. Villagers asked what these balls were. The warriors answered they were popular preserved food in fashionable Kyoto, made of yuzu fruits. The country people learned how to make it, and it became Yubeshi, or Yuubeshi. As they were suitable for soldiers to carry, they were like power-bar for athletes some 900 years ago. i.e. They are nutritious, and can be carried at room temperature. IDEAL!!!

Er, this is Yubeshi,
approx. USD 2 for about a dozen bite size.
 It’s not that we’ll make.
 For this one, please see below.

Thanks to electricity-eating method of google search, I could do research for the recipe of Yubeshi. You could do the same, but I have to warn you if you google “Yubeshi, recipe,” you probably found that for sweet rice cake with walnuts, or walnuts and sweet yuzu peels for yuzu fragrance (like here). They are lovely treat by themselves, but not Yubeshi as preserved food. We have to consume rice cake Yubeshi before it becomes hardened, maybe within 2 or 3 days. Yubeshi of Totsukawa can really be stored at room temperature for long, more than 6 months. Another difference between regular Yubeshi and power bar version is their commercial availability. Sweet rice cake Yubeshi can easily be found in supermarkets, like the photo above. They cost 1000 or so yen for large 9 Yubeshi cakes (for online shopping, please check here). For warrior Yubeshi, its price is 1000 or so yen for 1 Yubeshi, i.e. VEEEEERY EXPENSIVE. After checking the recipe you’ll know why it is such a gourmet delicacy … (Hmmmmm … I’ve heard similar food is found in Taiwan, but they sell them at more reasonable price …) Nonperishable Yubeshi is not difficult to make, but it takes time to complete cooking. That’s why I report you my adventure of Yubeshi at the end of March, after harvesting them in January. This week, let’s start from mise en place to make power bar Yubeshi.


First, wash ripen yuzu fruits, then cut the head of them to hollow out the fresh. Please be very careful not to break the peel of yuzu, and better to remove remaining membrane as much as possible. Don’t forget cleaning up inside the cut head as well.


The removed segments can be cooked for jam. Strip off the piths and seeds as much as possible, and stew them with sugar. I add sugar of 60% weight of the segments. The fruits have lots of pectin. Simply stewing the segments with sugar is enough to make yuzu jam. The skin of segments is somehow melted away in jam. You don’t have to fuss about them before cooking.


The Yuzu seeds can be used to make a natural skin lotion. The way to make it is simple. Put seeds (please do not wash them) in a jar and add distilled alcohol whose content is at least 35%. Rough amount of alcohol is max 10 times of the volume (NOT weight!) of seeds. Leave them as such for at least 10 days in a cool + dark place. When the liquid becomes slightly thick, it’s ready for use. It won’t make radical difference on your skin in a day or two. But my experience says using this for 6 more months as body lotion turns the skin smooth. Actually, yuzu seeds have the highest rate of pectin for their content, more than segments or peels. In addition, the lotion’s viscosity helps the potion to remain on the skin longer. So, the yuzu lotion can a powerful moisturizer, you see?

Magic fruits!


For about 10 yuzu fruits, other ingredients for Yubeshi are

  • Miso paste: of whatever of your choice. 250-500g, depends on your taste. Do you remember miso is salty (my post last week)? More miso means saltier Yubeshi.
  • Sugar: half or less amount of miso. The choice for the kinds of sugar is totally up to your taste. Using brown sugar, the taste of Yubeshi becomes earthier, but flavor of citrus could be overwhelmed.
  • Flour of your choice: wheat or rice, or even soy or almond. You can skip it if you like. I add them in order to retain some carb in the protein-heavy power bar. The amount of flour is the same as the sugar.
  • Sake: this is must if you use flour. For 500g of miso, 200cc of sake is a benchmark.
  • Mirin: it also is for flour. 500g of miso and 100cc of Mirin would do.
  • Sesame seeds: Lots of it, maybe 100cc or more for 10 yuzu fruits. White seeds could give straighter sesame flavor to Yubeshi than black one.
  • Walnuts: Chopped for the same amount of sesame. So, for 100cc of sesame, I use 100cc of shopped walnuts.
  • Other ingredients could be chopped peanuts. You can replace walnuts with peanuts, or use both.

From these components, don’t you think it will be a powerful power bar? Next week I tell you how to cook them. Please stay tuned!

I used fine rice flour called
Joshinko
上新粉 for my Yubeshi.

If you find a problem in the greenery of north-half of Yokohama, please make a contact with

Office for the Park Greeneries in the North
北部公園緑地事務所
Yokohama Municipal Government Creative Environment Policy Bureau
横浜市環境創造局
Phone: 045-311-2016 
FAX: 045-316-8420