Friday, October 8, 2021

Stroll: 2021 Laboratory of Forest Art


Hi, there. Long time, no see. How are you?

The strangest (probably) Olympics and Paralympics to date are over. And Naomi’s back to Yokohama’s forest! I may have a chance in due time to tell you my experience with Olympians and Paralympians for Tokyo 2020. But today is for my annual adventure with the art show by Laboratory of Forest Art. Actually they have opened their door on 19 September for 2021. Then, there is an artist, Takata Yoshiki, who joined the show for the first time this year. He may have miscalculated the time necessary to complete his work, and during the middle of September he said to the visitors, “I hope I can present my work in early October.” So, I waited and found his installation in the forest just last weekend. He’s kept his promise, you know. This post is for my impression about the complete version of 2021 Laboratory of Forest Art by Group the Creation and Voice of the Woods.


The forest of the Group is as always next to Yokohama Zoorasia. Since there is no parking, a recommended access to the show is by bus. The most convenient transportation is a bus ride to Yokohama Zoorasia, from JR Nakayama 中山 Station, Sotetsu Tsurugamine 鶴ヶ峰 Station, or Sotetsu Mitsukyo 三ツ境 Station. (Timetables are here.) Get off the bus at Yokohama Zoorasia and proceed further along for about 400m to the direction of #2 Parking of the Zoo. On your right, there will be a small gate with the sign GROUP the Creation and Voice of the Woods. If you visit the place during weekends, many buses will take us to the North Gate of Zoorasia that is the closest to the art exhibition entrance. When you leave the terminal stop of Zoorasia North Gate, go back a bit along the bus road, and on your left is the sign for the GROUP. From there enter the forest. The road is a relatively wide walking promenade. Soon you can see a big banner over there saying “the Creation and Voice of the Woods 創造と森の声.” For 2021 show, the artists presented bonus installations from their entrance from Zoorasia side. Or, you can come to the venue from Hikarigaoka Housing Complex, and leave the forest from Zoorasia after enjoying the promenade installations.

Zoorasia side signpost for their forest

One of the installations along the forest road.

Forest dragon leads us to the entrance of 2021 show.

The installations we can enjoy this year are in this map.


Each artwork has English manifestation presented by the artists themselves. You can find it on site, or in their Homepage. Anyway, here is the impression I’ve received from their show this year.

Installation #1: Yamamoto Mayo, “Amulet Membrane”


I think her installation is practically wonderful to protect trees from oak tree wilt. She wrapped trunks of oaks with transparent curing sheet, put colors with tapes, and hang mesh bags of bark as “amulet.” The result is a vivacious scenery to deal with ferocious infectious diseases ravaging Japanese broadleaved forests. Hey, it’s better to create something of a fun when we have to live with the pandemic, isn’t it?

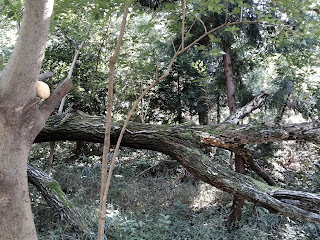
Installation #2: Kanai Toshikazu, “A fallen trees garden, One year later”


You should hang around the space the artist designated as his installation, in order to figure out what’s “One year later.” Honestly I found this search quite a fun.

Installation #3: ASADA, “Forest Dragon”


And here is ASADA’s dragon. Her work expands freely in a forest space. This presentation is something new as her installations in previous shows are often a symbolic recreation of enclosed domestic life … Her dragon evolves in front of our eyes if we walk around it. Magical.

Installation #4: Takata Yoshiki, “The Intrude?”


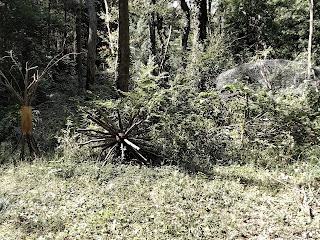
And here is Takata’s installation in the forest … Hmmmmmm, the object may indicate why he had to struggle with the environment and go beyond the deadline …

Installation #5: Chikada Haruna, “Forest of B”


This forest of the Group is often used by survival gamers for their fun shooting. The activity itself is prohibited by the City Ordinance. The gamers stomp the vegetation and scatter their pellet, which will quickly contaminate the ground as microplastic. The artists-keepers of the place think the gamers unpleasant. Yet, Chikada took “advantage” of intruders’ droppings to create her artwork. Please go there and find out how you feel when you work around the environment of her work. 😆

Installation #2 Redux: Kanai Toshikazu, “Voyage on a decaying boat”


Maybe, his intention is not the current installation, but the process of change his artwork will embark after the show. Let us visit the place year-around to witness how it will be.

Installation #6: Ishikuro Kazuo, “A Helper, Toh-Ningen (Tower Human)


It’s something an expression of anger by Ishikuro about COVID. Er, well …

Installation #7: Kobayashi Naoko, “Waking up quietly, 2020-2021”


If you think you need human voice or something to be non-quiet, her installation is surely in “quietly” category. But I found it is very lively chatters of forest plants when I walked around the installation and observed typical undergrowth of Yokohama’s forest. How do you think?

Installation #1 Redux: Yamamoto Mayo, “Amulet Membrane”


And when we stroll in the forest to this point, we notice there are several yellow something situated on the trees, large and small, here and there. They are also “amulets” by Yamamoto. To enjoy them, we must look around the trees from different angle. I tell you, it’s a fun!

Installation #8: Harada Akatsuki, “Communication of Trees”


Presenting tree-like objects in a forest is a continuous theme of Harada. This year, his trees are connected by Lines … it may be because of COVID … Can we be closer when we’re recommended to keep distance each other?

Installation #9: Yoshikawa Youichiro, “Ownerless Garden 2021”


Since 2016, Yoshikawa’s installation is to be left alone for its slow evolution. This year, he’s creating circle border by Lily turf and Dwarf Lilyturf … er, well, his effort has started to be swallowed by the forest itself, it seems to me. It must be a part of his “intention,” or forest’s will?

Installation #10: Oka Noriaki, “Forest Circus”


Oka prepared a stage for all the sounds, color, wind, rainwater, etc. of the forest. It’s a small stage perhaps for Lilliputs. We can walk around his installation, and imagine how the wind of forest presents her/his performance there …

Strolling to find artworks, I suddenly noticed walking around the art installation is really liberating. Unlike in art museums, here we can go to the back of installation, touch the work, or see them from the ground level of weeds. The artists’ creation is not in a white-walled empty space, but in Yokohama’s forest. The amount of info we receive in this way would be far larger than we obtain from a standard art exhibition. The wealth of stimuli reaching to our 5 senses is definitely rich, and so relaxing. With Forest Labo, it’s a nice change to leave from claustrophobic life with COVID … Let’s go to forests, guys.


If you find a problem in the site introduced in this post, the best contact address will be GROUP the Creation and Voice of the Woods.

https://morilab.amebaownd.com/

e-mail: morinokoe7@yahoo.co.jp


The city office which is in charge of this forest is

Office for the Park Greeneries in the North 北部公園緑地事務所

Yokohama Municipal Government Creative Environment Policy Bureau 横浜市環境創造局

Phone: 045-311-2016

FAX: 045-316-8420

Friday, July 30, 2021

Skunkvine at Olympics: Enoshima Yacht Harbor for Tokyo 2020 Sailing Competition


I don’t know why, but skunkvines are vigorous in Enoshima Yacht Harbor (; my post on June 30, 2017) where Sailings Competitions are held for Tokyo 2020 Olympics. Maybe these “looks-cute-but-smells-horrible” flowers do well with salty wind and sandy soil …


From tomorrow, medal sessions will start!


Friday, July 23, 2021

In order to survive Japanese summer: making Umeboshi, Part 2


Now let’s start the next stage for pickling Ume fruits. For 2Kg of Ume fruits, prepare 500g of perilla leaves (sans stems). Wash them under running water to remove dirt. Measure salt of 20% weight of shiso leaves. For 500g of leaves it’s 100g. Put 1/2 of leaves in a bowl and sprinkle 1/4 of salt over them. Begin gently massaging the contents with salt. After the leaves become soft, work them harder. Foamy bitter juice will come out of the leaves. Knead the leaves in juice a bit more, then squeeze them hard to remove the liquid. Discard the juice. Return the squeezed leaves to the bowl and add 1/4 of salt. Work the leaves with salt. The salted leaves will ooze out clear red juice. Squeeze the leaves again hard enough to remove the liquid as much as possible. Discard the liquid. Leave the squeezed leaves aside in a different bowl, and work with the remaining 1/2 of leaves in a same way.

Washed leaves with salt

The first kneading ends like this. Let’s squeeze it!

The beginning of the second kneading

It ends up like this. When we squeeze it tight,

the salted leaves yield this much of liquid.
 Please drain it.

Next, over the two balls of squeezed perilla leaves, pour white Ume vinegar out of the pickling jar. We can use just enough amount of liquid for the squeezed leaves to be loosened. To pickle Ume we may not need that much white Ume vinegar remaining in the container. Leave the vinegar just enough to cover the Ume fruits, and keep the rest in a sterilized bottle for daily cooking. Mind you, this vinegar is salty and VERY strong at least immediately after it’s out of pickling container. Using it for, say, vinaigrette may need some frequent tastings to make it right. Though, I found out if it is successful, in few years Ume vinegar can become extremely fruity, and even sweet. Now I have several bottles in my storage, keeping fingers crossed …

Ume fruits when I taken out from the container to have vinegar.
 They look fine.
😊

White Ume vinegar oozed out from the salted fruits

Let’s pour the vinegar over the squeezed perilla balls.

Gently massage the vinegar-coated leaves by hand. When shiso leaves turn bright purple red with the vinegar, stop massaging and squeeze the leaves gently. Keep the squeezed juice in the bowel. Unfold the worked shiso leaves without gaps on the Ume pickles, then pour the squeezed juice over the shiso-covered Ume pickles. Softly swirl the container in order for the juice to spread through the salted Ume fruits inside.

The salted leaves ready to be unfolded over the fruits.

Ume pickles covered by shiso leaves
 and coated with the salty shiso juice.

Seal the contents with plastic as the first stage, then put on the sanitized weight in the same kilograms of Ume fruit; if you start with 1Kg of fruits, the weight this time is 1Kg. Disinfect the inside wall of the container as before, cover the container firmly, and leave it in a cool and dark corner of your home as before. Check daily the condition of the pickles to treat the contents as before if it gets moldy. Now we wait until Japanese summer rainy season is over. It would take about 1 month or so, even under the condition of global warming. For Yokohama, these days the average date is in the last week of July for the Meteorological Observatory to declare the end of rainy season. When we can be sure rainy days are over, the final step for Umeboshi making begins.

Second pickling stage with weight.

In a sunny morning at the beginning of full summer, take out the perilla leaves from the container, squeezing them with a wood spatula and a tong to drop their juice in the pickling jar. Spread them over a sanitized bamboo sieve. Similarly, take out the Ume pickles, gently drain the liquid in the pickling container, and put them on the bamboo sieve next to the shiso leaves. You may be able to use stainless sieve but I’m not sure if metals can withstand acidity of leaves and Umeboshi. In Japan, around this time of a year, sales of bamboo sieves become strong. We can find large bamboo sieves in our nearby supermarket. Now only red liquid is retained in the container. It is another Ume vinegar, called red Ume vinegar. Pour it in a sanitized clear bottle.

Squeezing perilla leaves with spatula and,
 for me, chopsticks.

Taken out contents from the pickling container.

Let the Ume fruits, shiso leaves and red Ume vinegar sun-bathing in your garden or balcony. Please turn over the fruits and leaves once during a day. At dusk, withdraw them from outside, and take them out again next morning. Do a turn-over once again in the second day and retract them at the second nightfall. The third day, with one more flip-over during day, leave the entire fruits, leaves and vinegar outside to expose them to night dew. If it is difficult having 4 consecutive fine days, please take a day or two off until sun returns. I’m not sure if it is OK for more than 5 days to complete the process … Just ensure 3 days and one night exposure to outdoors for the shortest period. i.e., Reading weather forecast to spot the best timing for drying could be essential.

At the beginning of the second day

At dusk of the third day before the exposure to night dew

In the morning of the fourth day, Umeboshi is ready. The final step is how to store them. For the most general approach, dunk the semi-dried Umeboshi in red Ume vinegar, gently drain them then put them in a sanitized container. It will make Umeboshi redder and softer. Or, you can just store the semi-dried Umeboshi in a container without vinegar-coating. It will make the skin of Umeboshi hard, loved by samurais in Edo = Tokyo. For perilla leaves, you can dunk them in the vinegar and store them in the same container of Umeboshi. Or, they can be dried further under sunshine until they are parched completely. We then make them into powder called Yukari which is a convenient seasoning for Japanese dishes. If we can harvest more than enough red Ume vinegar for Umeboshi-coating, we store them in a bottle as white Ume vinegar. Red vinegar is also good for cooking. The taste is stronger than the white Ume vinegar, but it can also age superbly. My collection of yesteryears’ red Ume vinegar bottles is sitting neatly in a dark corner of our home, while I’m waiting for them to be sweet …

My 2020 Umeboshi in a storing jar,
 coated with red Ume vinegar.

I secured them tightly in a jar
 and stored it in a dark place.
 Why not eating immediately?
 Please see below …

Our homemade Yukari powder

I’ve found out the timing vinegars turn sweet comes suddenly. It’s like “yesterday morning they were salty, but today they become very fruity …” Homemade Umeboshi also ages gracefully. We can start eating them after 3 days of sun-bathing, but they definitely taste better 1 or more years later. Legend says there is Umeboshi in Kyushu made in 1576 … Wow. The owner of this Umeboshi has not tasted it as it is impossible to replenish the container once it’s gone. Of course. The beauty of homemade Umeboshi is this longevity and maturing. Supermarket version often contains chemicals, and the drying process is forced by mechanically created hot wind. Such Umeboshi cannot last even for a year … Er, well mine won’t last 450 years. We’ve already finished our 2018 version. During VERY hot and humid summer under Climate Change, we need something very sour and salty to survive ... Oh, by the way, you can skip “sun-bathing” to eat pickled Ume fruits. For such strategy, it’s not necessary but I recommend draining Ume fruits and shiso leaves from red Ume vinegar and store them separately from the liquid. This is like preserved lemons, as it becomes quickly “Ume paste.” Leaving the fruits and leaves with vinegar, the product would be waterier, you know … I don’t know how long they can last. I suspect their shelf life is not that long as Umeboshi.


If you find a problem in the greenery of north-half of Yokohama, please make a contact with

Office for the Park Greeneries in the North
北部公園緑地事務所
Yokohama Municipal Government Creative Environment Policy Bureau
横浜市環境創造局
Phone: 045-311-2016
FAX: 045-316-8420

Friday, July 16, 2021

Seasonal task: making Umeboshi, Part 1


In Japan, the most traditional way to deal with Ume plums (Prunus mume) is making Ume pickles, aka Umeboshi. It’s a sort of life-long mission to establish “one and only” kind of recipe for Umeboshi … There are several nonagenarians (such as she, or she) who are still honing today their 70+ years of Ume pickle making career. Naomi is a sort of new-born baby in front of these incredible seniors … But, actually, the recipe for making pickles is simple. The real crux of the matter lies in somewhere else, like the condition of fruits, weather, climate, or mental condition of the pickler … Anyway, this week and the next are for my recipe of making Umeboshi.


First we have to prepare fruits for pickling. For Umebobshi, preferably, Ume plums have ripened to yellow, not in unripen green. But I found we can use still young green fruits. The preparation method is exactly the same as for making Ume compote (; my post on June 21, 2019), except for perforating the fruits with bamboo skewers. As fruits are fully ripen, we do not need to hasten the “detoxification,” i.e. no need for nicking. When we use green Ume, we soak them in water longer, and still no need to puncture the fruit. Making pickles is easier than cooking Ume compote, I tell you.

Washed and prepared Ume fruits.
 Yeah, they are still green but not so much.
 It’s OK to use this level of ripening.
 Could you see their skin does not have punctuation?

Second, sprinkle distilled strong alcohol, like vodka or gin, over the fruits and gently smear the liquid to the entire Ume by hand. At the same time, sprinkle the same alcohol to the sanitized pickling container. It’s to make it easy for salt to be attached to the whole fruits. Next, weigh salt for pickling. Once it was standard to use salt in the amount of 20% of weight of Ume fruits for Umeboshi. So, if the entire Ume plums prepared was 1Kg, the salt to be used was 200g. When we consider health problems of too much salt, this recipe was … er, risky. So, these days standard recipe for Umeboshi recommends 15-18%, or even 12%, of weight for fruits. But, I tell you, for novices, reducing the amount of salt is tricky. Especially for hot and humid Japanese summer, insufficient amount of salt will make the pickles rotting quickly. After many tears dropped, I’ve settled at 18%.

Alcohol-smeared fruits.
 I used Shochu, distilled Japanese beverage.

Leave 1/3 of salt for the final coating and sprinkle enough salt from the rest over the bottom of pickling container. Gently place liquor-coated Ume fruit one-by-one to cover the entire base of the container. When the bottom becomes invisible due to the fruits, scatter the salt over the fruits and make the second layer. Repeat this until the entire fruits are neatly stored in the container. Cover the top layer with the saved 1/3 of salt.

The bottom of the pickling container

The top layer with 1/3 of salt over it.

Seal the salted Ume fruits with plastic wrap. Avoiding the exposure to outside air is the best for the pickles not getting moldy. Considering the problem with plastics, there would be better way to seal Ume pickles … I still cannot find it. So sorry. Next, put on sanitized weight over the salted and covered Ume fruits. Ideally, the load is 2 to 3 times heavier than the fruits. If you use 1Kg of fruits, the weight would be 2-3kg. We can use lighter weight, as sometimes the container cannot have that large mass. I’ve found the lighter the weight, the longer it takes for the fruits to reach to the final process. If you want to make pretty pickles, I recommend to follow “2 to 3 times heavier” standard.

After sealing the pickles with plastic wrap,
 I place a small plate to hold weights
 without crushing the fruits.

My weights.
 They are rocks of Tanzawa
丹沢 harvested from
 Yadoriki Water Source Forest
やどりき水源林. 😊

Clean the inside wall of the container with sanitized cheese cloths or paper towel. Cover the container tightly and leave it in a cool and dark corner of your home. Check daily the condition of the pickles. In about a week or so, clear liquid will ooze out. It’s the sign pickling goes OK. If you cannot find the liquid after 7 days, your weight is too light. Better considering more load over the fruits. The fluid is white Ume plum vinegar, salty but very useful ingredients for our daily cooking. Just leave them as such for 2 to 3 weeks more. If the contents start getting moldy, gently remove and discard the molded part (fruits and vinegar), spray strong distilled alcohol to the remaining pickles, and clean the inside wall of the container with paper towel dampened by vodka or gin.

My pickling jar.
 Originally, this container was for making miso paste.
 The mouth of the jar is a bit small for Umeboshi making.
Now I’m searching for a better container
 in a reasonable price range …

In Japanese supermarket, 2-3 weeks later from yellow Ume plum fruits appeared for sale, red shiso (perilla) comes. It’s the sign we should start second stage for Ume pickling. I’ll tell you how next week. Please stay tuned. 😉


If you find a problem in the greenery of north-half of Yokohama, please make a contact with

Office for the Park Greeneries in the North
北部公園緑地事務所
Yokohama Municipal Government Creative Environment Policy Bureau
横浜市環境創造局
Phone: 045-311-2016
FAX: 045-316-8420